- Administration
- User management
- Bulk manage users via CSV or Excel
Bulk manage users via CSV or Excel
Learn how to add new users, update existing users, and manage user fields in bulk using CSV or Excel via the web app.What does it mean to manage users in bulk via CSV or Excel?
Managing users one by one can be time-consuming, especially when you're working with a large team and a lot of details. By managing users in bulk, you can add new users and update existing ones in one go, making it easy to keep user details like seat types, permission sets, sites, groups, and user fields up to date using one CSV or Excel file. It’s a simple way to efficiently maintain your user list and keep your organization running smoothly.
You can only bulk add or update up to 50,000 users per file at a time.
Bulk manage users via CSV or Excel
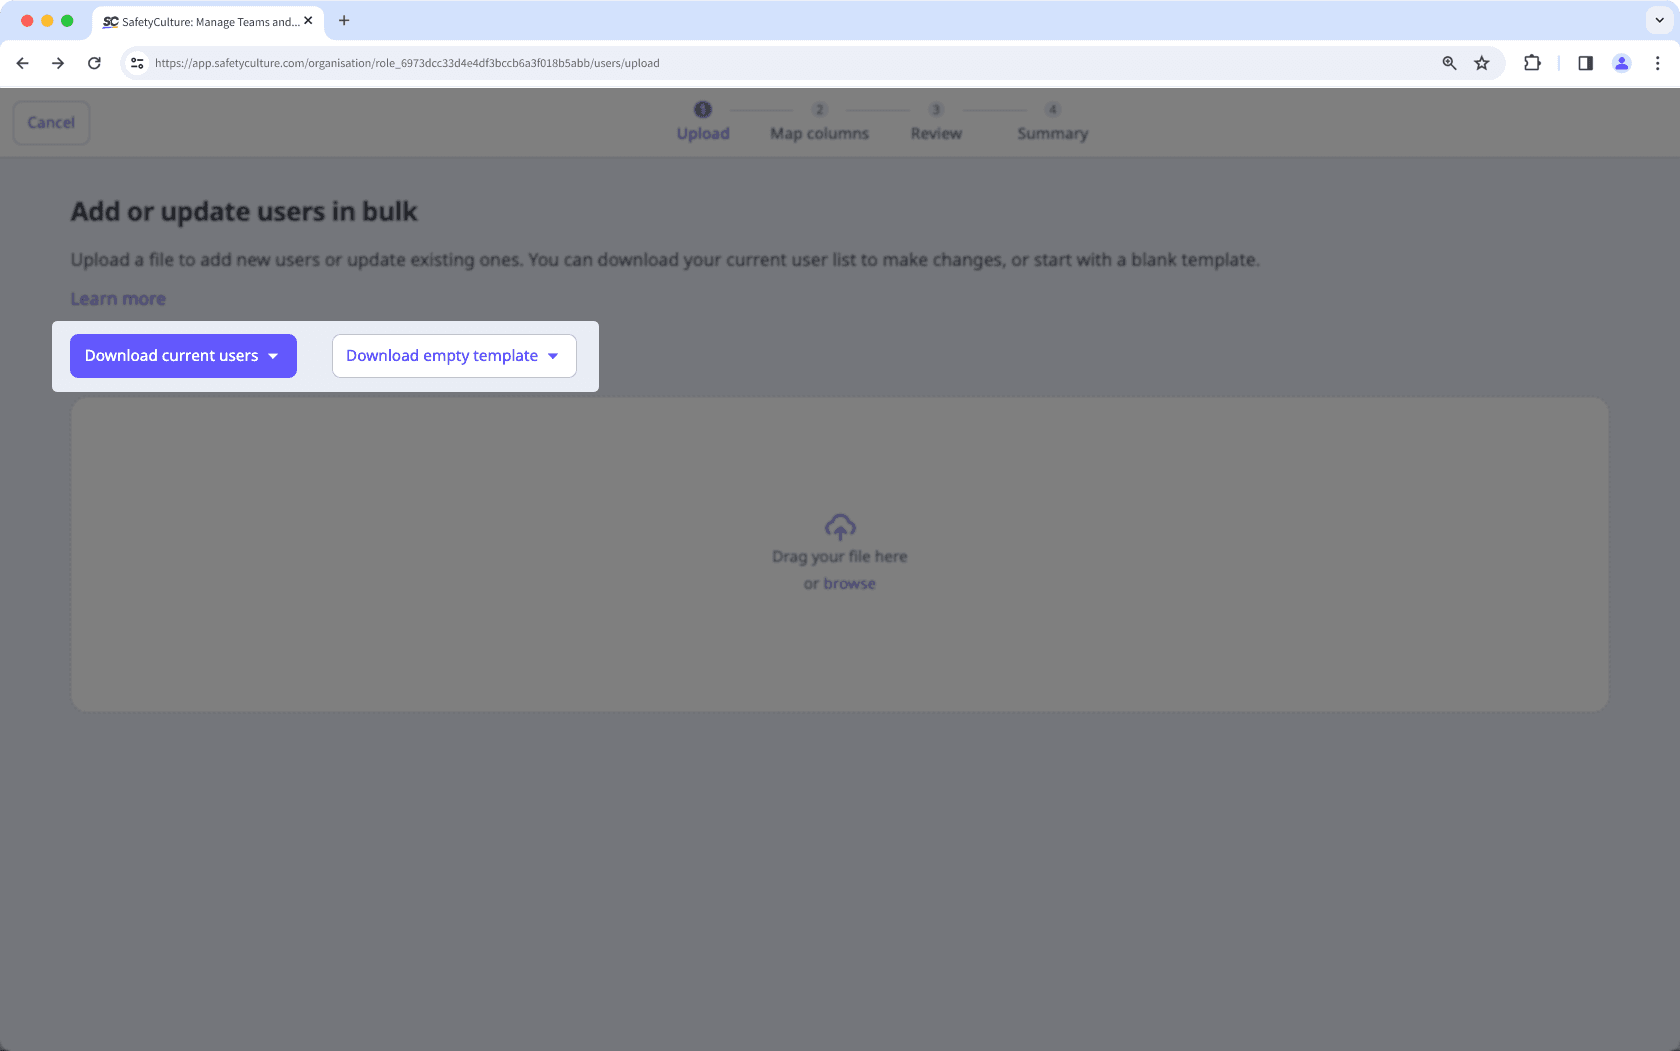
Click your organization name on the lower-left corner of the page and select Users.
Click
 on the upper-right corner of the page and select
  Bulk manage via CSV.
Click
 Download current users if you want to make updates to your existing users or Download empty template to start from scratch.
Select the file type you want to download.
Default fields
You can manage the default user details accordingly in the CSV or Excel file. For the details needed to be added to the file, refer to the "CSV and Excel column headers" section in this article.
Custom user fields
You can also manage the details for each user field, depending on each field's data type:
Text: Enter alphanumeric inputs. Responses for the "Text" data type are case-sensitive.
Date: Enter a date.
User: Enter the full name or user ID of the user in your organization.
Multiple-choice: Enter any existing response created for the user field.
Return to bulk managing users via the web app.
In the "Upload" page, drag and drop your file into the "Drag your file here" box or click browse to select the file from your computer directory.
In the "Match columns" page, match your CSV or Excel column headers with their corresponding fields in SafetyCulture. Then, click
 Next.
Next.
In the "Review" page, review the data from your CSV or Excel file, and resolve any errors or change a user's details in-line. After resolving errors, click ![]() Revalidate.
Revalidate.
To display only users with errors, toggle "Show only rows with errors" on.
To display all new users added and existing users updated, toggle "Show only new and updated users" on.
To download all users with errors, click
 on the upper-right of the page and select XLS (Excel).
Once you're ready, click ![]() Next.
Next.
In the "Summary" page, review the number of users being added and updated.
You can turn "Send welcome email to new users" on and click
 to add a custom message. Then, click Next.
Your file will be processed in the background. Once finished, you will receive an email with a list of users who were successfully and unsuccessfully processed. You can also view the upload status in the "Import history" page.
If your organization doesn't have available seats when a user is added, SafetyCulture will either purchase a seat automatically or block the user from being added.
Automatic seat expansion is currently in Early Access. If a seat is purchased, your billing administrator will receive an email, and your next invoice will include a prorated charge.
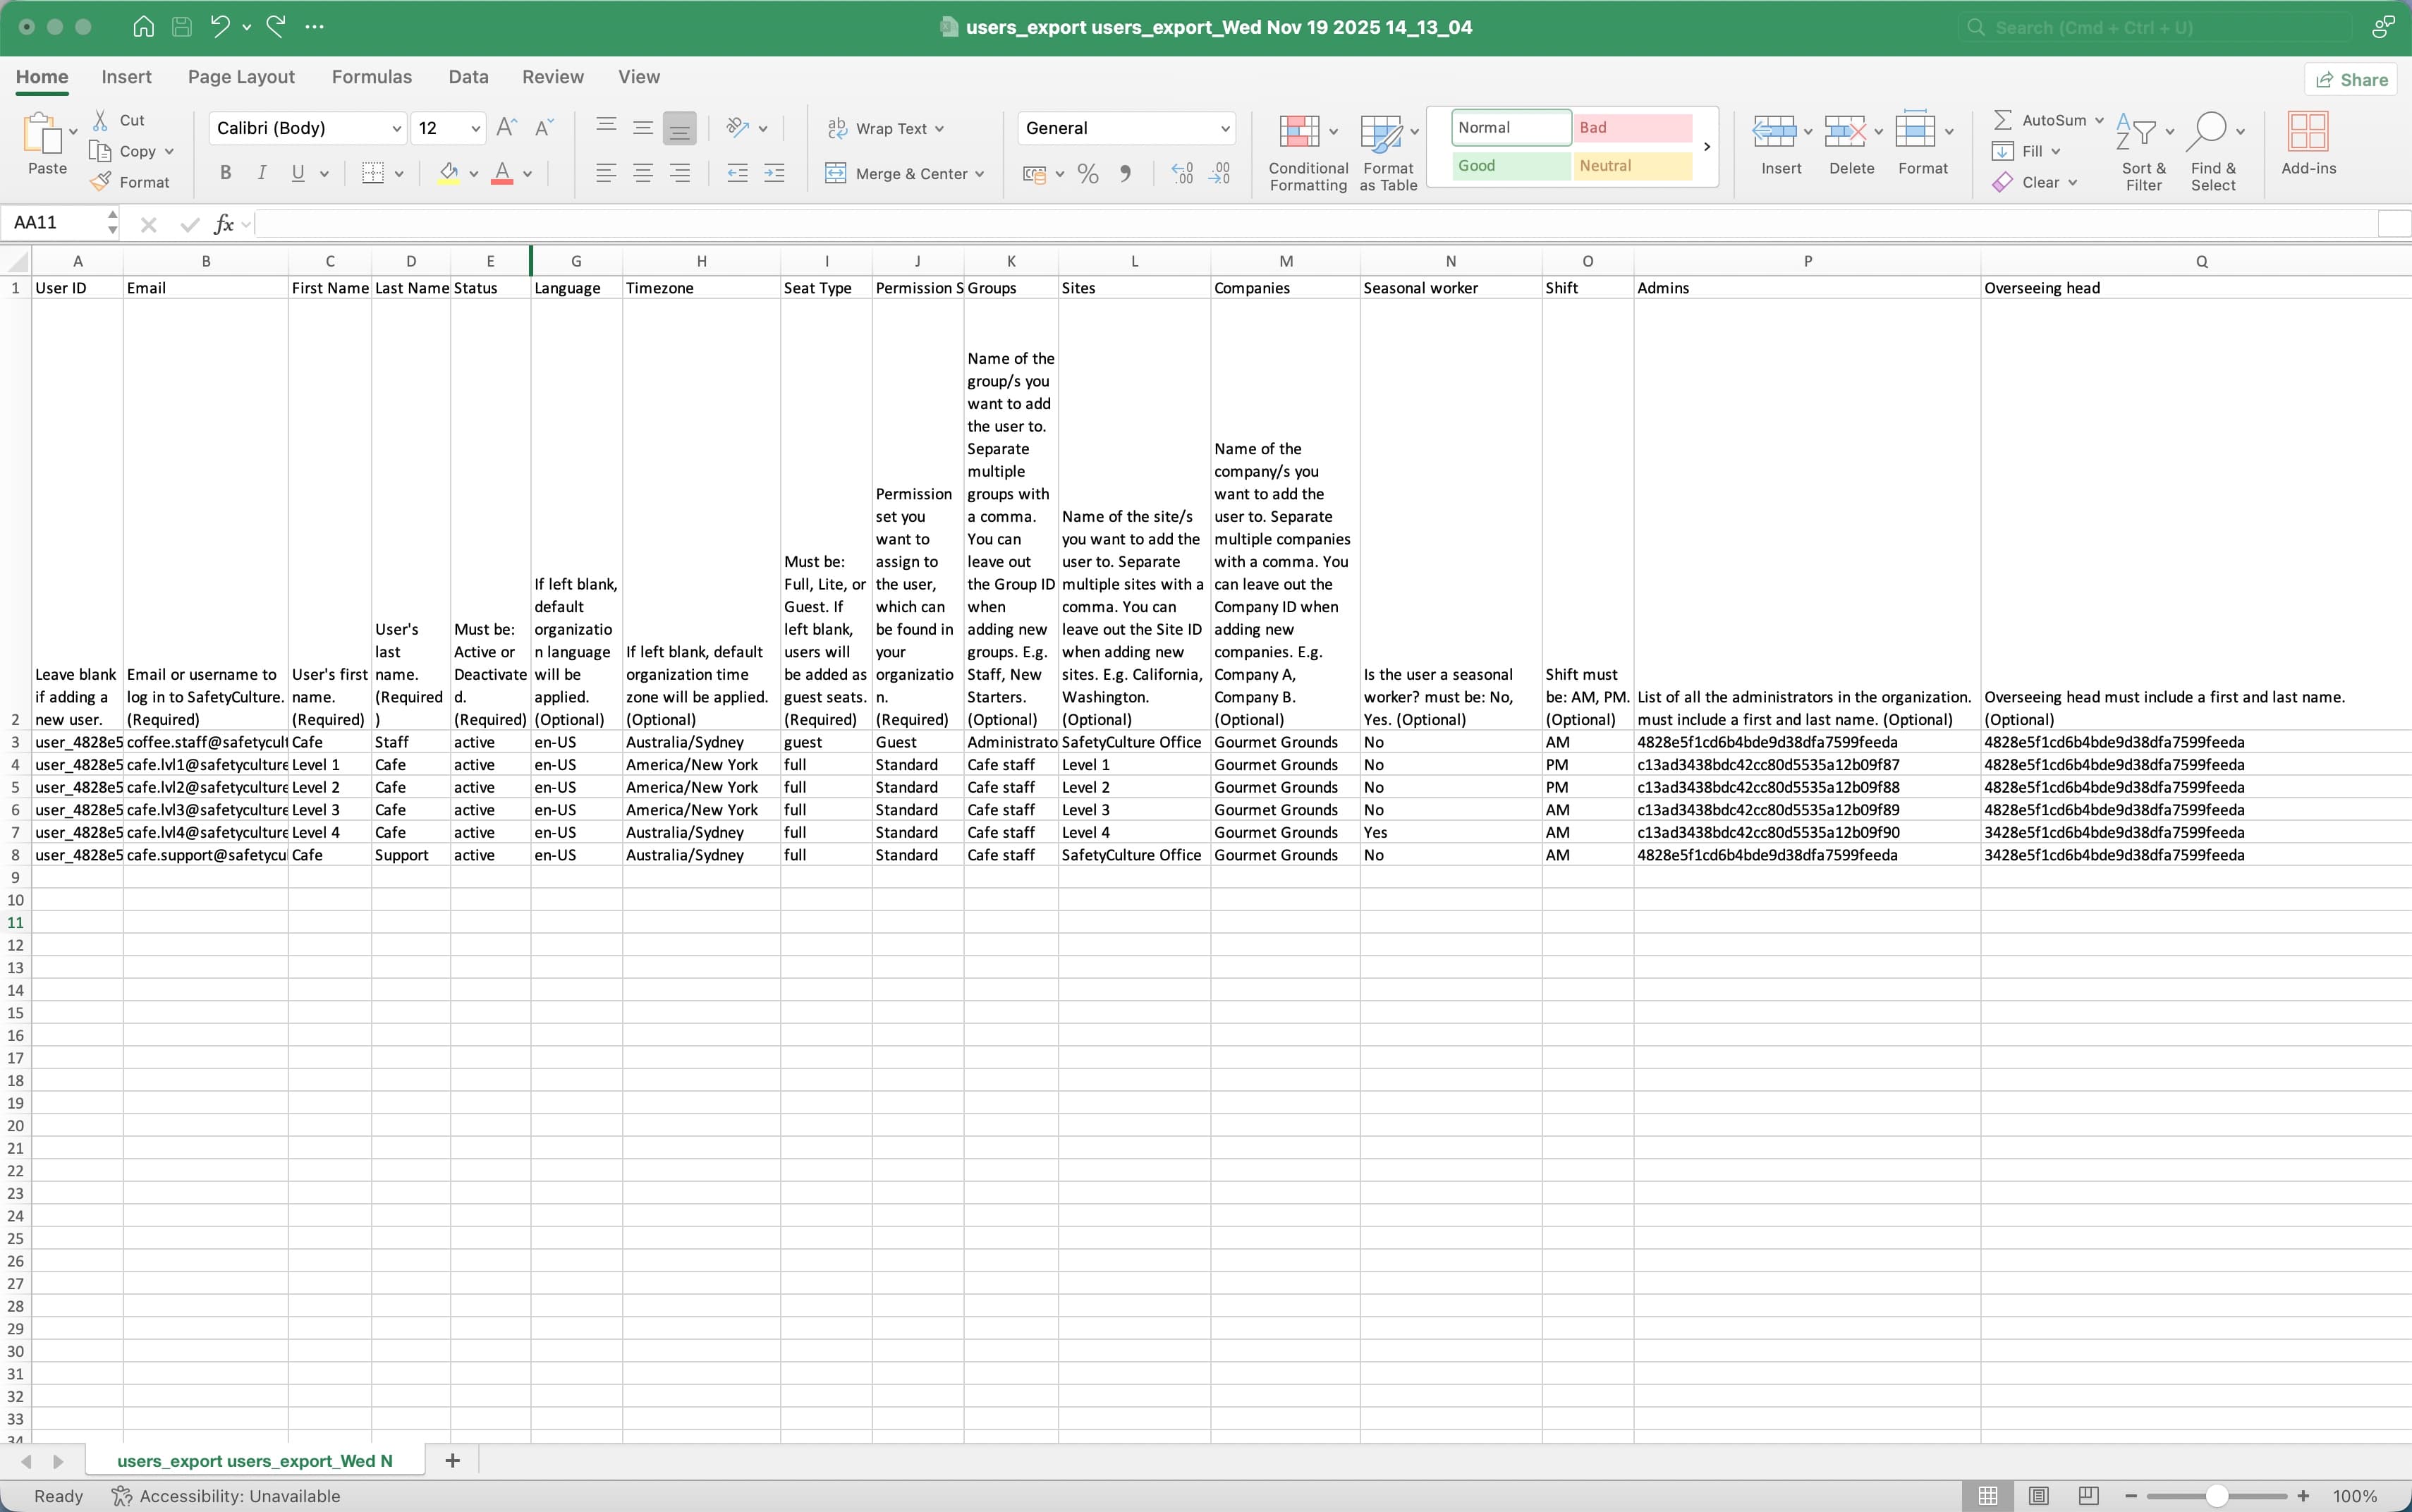
CSV and Excel column headers
Column header | Description |
|---|---|
User ID | The unique ID of each user in your organization. |
The account email address of a user. Updating existing users' email addresses is currently unsupported. | |
First name | The first name of a user. |
Last name | The last name of a user. |
Status | The account status of a user. Use "active" for new users or "deactivated" for existing users. New users can only be set as active. |
Password | The password of a user, which must be at least 8 characters, containing an uppercase letter, a number, and a special character. You can only set passwords for new users. |
Language | The account language of a user. Refer to the "ISO-639 language codes" section in this article for language codes that are supported on the web app. |
Time zone | The account timezone of a user in IANA timezone or Country/Region format. For example, "America/New_York". |
Seat type | Available on Premium Plan and Enterprise Plan only. The seat type of a user. If left blank, the user will be assigned a guest seat by default. |
Permission set | The name of the permission set of a user. Users' permission sets can only be updated if you have "Platform management: Permissions" permission. |
Groups | The names of the groups of a user. |
Sites | The names of the sites or levels of a user. |
Companies | The names of the companies a user is associated with. |
Custom user fields | The custom user fields of a user. |
ISO-639 language codes
The table lists all languages supported via the web app.
Code | Language |
|---|---|
de | Deutsch |
en-US | English (United States) |
en-UK | English (United Kingdom) |
es | Español (España & México) |
fr | Français |
it | Italiano |
nl | Nederlands |
pt-BR | Português (Brasil) |
Frequently asked questions
You can set passwords for new users being added to your organization. However, updating existing users' passwords in bulk via CSV isn't currently supported. You can edit a user's password by managing their user settings instead.
Updating email addresses for existing users isn't currently supported. If you change an existing user's email address in the CSV or Excel file, they will be added as a new user instead.
Columns for user details such as their email, name, and status can't be left blank to successfully process the new and updated users. However, other columns such as seat type, permission set, groups, sites, timezone, language, and user fields can be left blank and managed for your users later on if needed.
Users whose seat type is blank will be provided a guest seat, along with the "Guest" permission set.
Once the file is successfully processed, you'll receive an email confirmation with a summary of your upload. Please note that while your CSV or Excel file can be successfully uploaded, you may need to review and resolve errors by uploading another file.
You can also view the upload status in the "Import history" page.
To ensure that you add or update as many users as possible, adding new users or updating existing ones without errors will proceed as normal. However, users with unresolved errors may be skipped, or not all updates may be made.
We recommend resolving any errors in the "Review upload" page to ensure that all changes in your CSV or Excel file will be successfully processed.
Yes, the "Import history" page lists down all uploads in your organization including a list of users processed, updates made, and errors that they may have ran into.
Click your organization name on the lower-left corner of the page and select Users.
Click on the upper-right corner of the page and select
 Import history.
Was this page helpful?
Thank you for letting us know.